Red Dog and Me

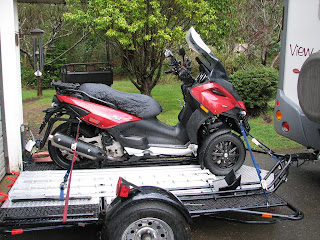
This is an on-going dialog between me and a certain motor scooter, namely a 2009 Piaggio MP3 500 that came to live with me in October of 2009. I've named the scooter Red Dog and as yet have not determined its gender. In the past when I've named boats, bikes, and other like characters I've thought of them as feminine due to their behavior characteristics. Red Dog I'm not so sure about...we'll see. Update: OK, Red Dog's a girl...with an attitude

Tuesday, April 5, 2011

April 4, 2011 The Elusive Cruise Control farkle…

When it comes to cruise controls for motorcycles there seems to be no limit to design and function. For years there have been several “flip-over” models, all of which do little more than lock the throttle in whatever position it’s in when you set it. They’re inexpensive and for the most part seem to work pretty well; I’ve got one on my sidecar outfit and it’s been a blessing on long rides.
.
Releasing or cancelling the flip-over’s grip on the throttle is achieved by thumbing the control lever to the off position. For the most part these work OK but when it comes to hilly terrain they’re not much good. Imagine if you will the excitement of cresting a hill with the control set full on and suddenly you’re accelerating downhill with the throttle maxed…. Canceling the cruise setting can be a bit unsettling if not downright scary during those times.
.
Other types have come along that do a better job by incorporating easier shut off actions. Sadly all of those manufacturers warn against using their products on bikes equipped with heated grips. No one seems to know exactly why that is but I suspect it has something to do with liability, maybe those devices wear through the heated grips or something.  Of course that’s one of the most desireable options so naturally Red Dog is outfitted with Hot Grips.

Go Cruise Throttle Control

Recently  one of the MP3 forum members posted a link to newbonneville.com, suppliers for a product called Go Cruise Throttle Control. Like many designs it’s simple as can be, works sort of like a clothes pin gripping the bikes throttle control. 

Mounted on Red Dog
The thing that sets it apart from the flip over type is part of the unit sticks out over the front brake lever so when you pull the brake it slides the throttle control back to a reduced speed.

Hey it even works when you're not on the bike!

This concept sounded like a good idea and I figured for the relatively low price of $27.94 delivered I had to have one. It turned out to be a slick device that seems to work pretty well. About the only drawback I’ve encountered on Red Dog is it’s possible to set the throttle and then start the engine. On an MP3 that's not a good practice as the front end unlocks at certain speeds…

Those who are familiar with that model will appreciate what might happen to anyone not paying close attention. I didn't drop Red Dog but I was fairly busy for a few seconds. Woo Hoo!

March 30, 2011 Red Dog’s Saddle – One more time

In February of 2010 I made the long journey to Rich’s Custom Seats way up in Kingston, WA. The round- trip from Bandon clocks just under a thousand miles which makes it a bit of an adventure if you’re riding a scooter. I chose to trailer Red Dog behind the RV as you never know what you’ll encounter. Like Zombies maybe...


Beautiful Leather but too slippery for Red Dog
Besides, it was February and camping doesn’t appeal to me when it’s nippy out. When the new saddle was all done up in gorgeous leather & tri-color stitching I headed home to Bandon and it was still raining hard.

A couple of days later the sun finally popped out for a brief time and I was able to sneak in a short ride of 100 miles or so. The new saddle wasn’t quite what I’d hoped for although the back rest felt pretty good. The problem with the saddle was simple: That gorgeous leather surface was slick as a whistle and I found myself sliding forward about every 11 seconds unless I hit a bump and then it was immediate.
.
This resulted with my being thrust into a laid-back slouching position, the kind I usually assume when I watch the tube. While that may enhance TV viewing it really doesn’t do much for piloting a motor scooter as I was continually having to push myself back to a more upright position. Remember your Mom yelling at you "Sit up or you'll get a crooked back!" Every 11 seconds kids, not good.
.
Figuring this must have happened to others I queried the members of the MP3 forum I frequent and a number of suggestions were proffered, the most common one being to raise the front of the saddle by installing shims under the front hinge. I tried this method and it helped somewhat but it still needed something more. The bad part of this solution was the saddle now allowed water to enter along the raised part which flooded the under-seat storage area.
My next step was to contact Rich O’Connor the owner of Rich’s Custom Seats to explain the dilemma I was in. He suggested sending the seat back and they would make some adjustments to it and return it to me. That sounded like a better idea than driving back up so I packed it and shipped it off.


Rich looked it over and performed a few tweaks on it and shipped it back. It was a bit better but the sliding continued and on rides of any duration it was still pretty miserable.


Thinking maybe I needed to sit differently on a scooter I decided to live with it for awhile to see if I could adapt. Months went by and instead of taking Red Dog on my 2010 summer tour I left her in the barn and went with a different rig, a new Kawasaki Vulcan 900L.


When I returned in late summer I once again turned my attention to making Red Dog into the grand touring machine I felt she was capable of being. Over the course of the next few months I tweaked and fussed and messed with all sorts of ideas about where to ride her and how long I’d be on the road, etc. Still the moderately high level of discomfort of the saddle haunted me and I decided the only solution was to have the cover redone in a non-skid material. I again contacted Rich’s and after discussions they mailed two samples of material they thought might resolve the issue.


One sample was a bit heavier than the other which meant it would wear longer and the other had a much courser surface grain which would provide the most resistance to sliding.


Super non-skid vinyl
I chose the latter; I wanted the problem to go away for good. It was time for the return run to Kingston, WA. 

Ready for the return trip to Rich's Custom Seats

On Tuesday March 29th I loaded Red Dog onto the bike trailer and headed north, stopping in Portland for an overnight visit with friends.


As a side trip I'd also scheduled a meeting with the Aussie Rescue people in Molalla, OR. We’d recently lost Daisy, our 13-year old Australian Shepherd and it was time to start looking for another one. There are an amazing number of homeless dogs in the world and our place is perfect for a couple of them.


The Molalla agency turned out to be a good call; the dog I’d been scheduled to see was fine although way too jittery for my liking but while I was there they brought in another candidate, a one-year old male Aussie. He’d just arrived back at the shelter that day after spending 4 days on a trial period with a potential family. Evidently it didn't work out for them but I liked him right away and in less than two hours we were on our way to Portland.

What a happy face!
They say that traveling with someone is one of the best ways to find out how compatible you are. Toby and I spent the next few days bumping along in the motor home and we soon discovered we like each other.


* Update note at home: Contrary to what I'd been told he isn't house broken and his pretty wary of kids, especially 6-year olds like our granddaughter. The question of cats is still out there as we don't have one right now. None of the above items are deal-breakers, Toby's already worked his way into our hearts and he's found a home.


Back to the story about Red Dog's saddle redo. We camped that night on the parking lot of a small office building in Portland and in the morning we set out early for Kingston. The drive north was easy, barely 250 miles and we arrived at Rich’s right at lunch time.


They have a small RV area for out of town customers so after off-loading Red Dog I set up camp. Rich's facility is better than nearly any campground you’ll come across and he lets you stay there free while they work on your bike. Service like that is practically unheard of, isn’t it?


That afternoon they took the scooter right in and began work on redesigning the saddle. Rich’s goal was to reshape the underlying foam material into a new base with a higher rise to the front.

Tear it apart & start over


Checking the fit

He also wanted to see if we could save the leather cover but it was no use; for this particular application it was just too slippery.

Rich returning from one of several test rides

Cutting the pattern for the new cover
After shaping and reshaping and multiple test rides he decided to give it up and go with a totally new cover, this time using the vinyl with the super sticky surface. Both of us hated to see the leather go but sometimes even the best laid plans…

Antonio sewing the new cover
 Antonio, one of Rich’s key employees did a lot of the work with Rich doing the design changes and critical cutting of the foam. Antonio handled assembly and sewing of the cover which he made using patterns he created from the foam base.

The new saddle ready to ride
 The whole process took hours, all of the rest of Wednesday and with an early start on Thursday they finished mid-afternoon. It was raining when it came time for me to do the test ride, the same as it had been doing last year only this time I was determined to pay very close attention as to how well it fit me and whether or not there was any tendency to slide around.


I donned my one-piece Roadcrafter which is a super rain suit, added helmet and gloves and headed out. The rain was coming down fairly hard but it was easy for me to feel the difference; this time the saddle felt like everything it should be, comfortable fit and no sliding around whatsoever. I headed back to Rich’s shop and gave him the thumbs-up sign, we were finally done.


It was nearly 3:00pm by the time I got Red Dog reloaded and all strapped down for the run home. We were planning on another overnight stay in Portland and then would make the final 250 mile drive to Bandon. Everything went smoothly; we arrived in the late afternoon on Friday without mishap.


This has been one of the longest on-going projects I’ve encountered with Red Dog and certainly the most expensive. It was an essential one though and I’ve learned a lot during the process which will serve me well should I ever require another custom saddle. And I can truthfully say that any future saddle work I have done will be at Rich’s Custom Seats; their level of customer care is the best I’ve ever experienced. FYI - http://www.richscustomseats.com/

Overall this has been a great trip, I came home with a much improved saddle for Red Dog and a new Aussie Shepherd pal. What more could you ask for?


PS – This part is just for fun: Besides being a skilled saddle maker Rich’s interests range far and wide when it comes to military collectables. One of his many on-going fun projects has been the creation of a sidecar rig using a bomb shell for the sidecar. Sure, it’s an old kiddy car but isn’t it great?

Bombs Awaaaaay!


Monday, April 4, 2011

March 24, 2011 Auxilary Power Outlet

After only a year and a half I’ve finally gotten around to installing a power outlet that I can plug my battery charger and new electric vest into. I’d already installed a controller for my old vest but last year I had to buy a replacement as my original one went kaput just before I was to leave on tour.

The Auxilary Outlet installed


All of this may sound a bit fuzzy but the bottom line is the two vests require different outlets and their respective cords are on opposite sides.
Think planned obsolescence and you’ll get the picture.
I chose to mount the plug just below the main body panel where it’s convenient to connect the vest. You’ll need to drill one hole in the plastic panel for this purpose.

To begin the wiring process you must first select a point where you can tap into the bike’s 12 vdc power system. For this application the nearest and most convenient spot was the backside of the power plug located underneath the saddle.

Back side of power outlet underneath saddle exposed

To access the back of the power plug you need to remove the left side plastic body panel. This exposes the interior light which you can see lit up in the photo and the plug which is located to the left of it.
Power to the plug-in is on all the time so it is necessary to remove the 15amp fuse located in a fuse panel just to the rear of the battery. The panel is located in the under-seat storage area which makes it a simple task.

Once the plug has been powered down you can roll the weather proof shroud down that covers the back of the plug. This exposes the two wires feeding it which you can use as a point to tap into. Using a #1 Exacto knife I carefully trimmed away ¼” of insulation on each wire; then wrapped the two new wires onto each and soldered the connections.


When finished you need to wrap each one with electrical tape and then pull the weather proof shroud back over the connections and plug. Don’t forget to re-install the 15amp fuse when you’re done. You can see in the above photo the lead wires hanging down from the plug, ready to connect to the new Auxilary Power Outlet.

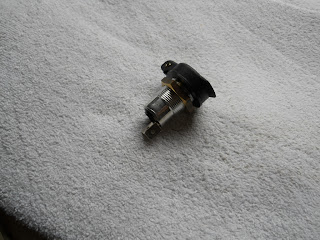
New Weatherproof Power Outlet

I bought my auxilary power outlet from Aerostich Riders Warehouse but they’re also available at electronic suppliers; just make sure the one you choose is weather proof and of high quality.


While I was doing this project I also ordered a right-angle male plug to use with the new outlet. This makes for a tidy connection that doesn’t stick out as far and also helps keep  the vest's power cord from flapping in the wind.


Right Angle Plug with 2-wire connector
The right-angle plug came ready for hook-up so I shortened and connected a standard two-wire “flat trailer connecter”, available at auto parts stores. This plug is compatible with my electric vest, Battery Tender, and tire pump.


The amount of time required for the project was only a couple of hours and as you can see in the photos it makes for a very sanitary look.


New Auxillary Power Outlet

Weatherproof cover is spring loaded

For those who are interested here’s a link to AeroStich Rider Warehouse.
If you spend money there tell Andy he owes me big time. http://www.aerostich.com/catalog/US/index.html


Sunday, March 13, 2011

March 12, 2011 What the devil’s a Laminar Lip? And is it contagious?

Constant wind buffeting on a motorcycle or  scooter can quickly lead to fatigue which can greatly reduce the enjoyment of riding. I’m not referring to short distance rides or those lasting less than a couple of hours; I’m talking about day-long rides covering 200-300 miles or greater as you'd encounter on a tour across country.

Red Dog with her new GIVI windshield
When I first got Red Dog she came without a windshield having only a small airfoil type of device to help stave off the wind. You can see what that looked like in the main picture in the blog title. That worked ok but nowhere near well enough to deflect an ample amount of wind and when it came along, rain pelted me mercilessly. 

To improve things I installed a GIVI windscreen and that helped a lot; suddenly Red Dog was transformed from a hooligan into a much more sophisticated lady. 


But even with that I could still feel a fair amount of buffeting as the main wind stream collided with my face about midway up. Wearing a full-faced helmet helped but my noggin was still wanting to act like one of those bobble dolls you see in the back windows of cars. I had to find a cure and decided to look into a well-known product, the Laminar Lip.

Several members of the Modern Vespa Forum website had already installed the “Lip” on their scooters and were kind enough to post reports as to how well they worked and stating that they liked them. The only downside was Laminar isn't making a version specifically designed for the MP3's GIVI windscreen but the one that fits the CanAm Spyder is close enough and seems to work ok.

One day not long ago I was having coffee with Jerry Smith, a rider friend who also happens to be in the business of writing for a number of publications and is often called upon to evaluate motorcyle products. When I mentioned I was going to have a look at the Laminar Lip he said he had one he wasn’t using and if I wanted it he’d bring it by next time we had coffee. Neither of us was sure if it would fit Red Dog’s GIVI windscreen as his was for a Suzuki V-Strom but I was open to trying it.

3M Dual Locks
The only thing I'd need to do would be obtain new mounting tabs and I'd be set. I contacted the Laminar Lip factory to see if I could order the 3M Dual Locks that are used for mounting and it turned out they are available in small quantities for $6.00 per package. The guy who answered their phone was friendly and super helpful saying he’d mail them out the same day which he did.
 
When they arrived I followed the installation instructions that I downloaded from their website and after a 24-hour waiting period for the glue to dry I pressed the Lip in place.


Laminar Lip installed
So far I’ve only ridden a few hundred miles with the Lip but I can definitely tell the difference in the way wind buffeting occurs.

The Lip redirects the wind stream upwards over the top of my helmet which greatly reduces the buffeting and also the wind noise, a very welcome benefit. Overall I'm happy with the results; this is one farkle that's going to be great to have.


To sum up I think most riders would realize the same benefits using one of these novel accessories and the price of $84 is much less than that of a taller windscreen.
Here’s a link to the Laminar Lip website where you can learn more about them: http://www.laminarlip.com/  


Plus you may want to read an article published on webBikeWorld.com, another of my favorite information resources: http://www.webbikeworld.com/laminar-lip/

Hey, lest I forget…THANKS JERRY!

Mar 05, 2011 The RotoPax Fuel container – worth the bucks?

One of the items that’s been discussed to no end on the Modern Vespa Forum is who makes the best fuel container for hauling spare gas. Piaggio’s MP3-500 scooter's fuel tank holds a miserly 3.1 gallons so figuring you’ll get around 50-55mpg your trip range is limited to around 150 miles. That’s not very far if you’re planning on touring as there are a lot of places with gas stops well beyond that distance; therefore the MP3-500 rider needs to carry at least one gallon of spare fuel; two or more if he can find room.

The scooter forum members have taken all sorts of approaches to solving this problem; solutions ranging from cheapie 1-gallon plastic cans small enough to store under the seat to some fairly sophisticated custom setups involving special brackets holding modified fuel cells. Locations for these items range from under the saddle to inside top boxes to special bracket mounts on each side of the scoot.

Prices have ranged all over the map and scooter guys being somewhat on the frugal side have done their best to get by with the least outlay of their hard earned cash.

My own first venture into this issue resulted in a small 1.1-gallon plastic jug that fits snugly underneath the seat as if it were custom made for it. The price at our local True Value Hardware was a mere $5.00 at the time I bought it but since then has gone up a bit to nearly $7.00.


It was (and still is) a nice little jug but recently when I lifted the seat up I smelled gas fumes even though the day was cool and it had been raining recently. This bothered me quite a lot as the places I like toride when I’m touring are often very  hot and I feared the little jug might decide to go boom should a spark  occur within the confines of the seat.

Carrying that thought a bit further I had a brief visual of myself flying through the air with most of my fanny a lovely charcoal color trailing an odd looking cloud of smoke behind.

With that in mind I decided to bite the bullet and spend some serious money for what I believed to be the best quality fuel container that would fit under the saddle, one of RotoPax’s 1 gallon units. Their company makes a variety of very tough fuel containers for the outdoor sports market most of which are designed to be mounted on quads and motorcycles.  

Like most things that are top-of-the-line they aren’t cheap. Their 1-gallon model to replace my $5.00 hardware store cheapie came in at a whopping $50.00 plus another $10.00 for shipping making it more than 10 times as costly. At first that might seem highly extravagant but they’re guaranteed not to leak and they’re designed to mount in any position. That plus their agreeable size makes a perfect fit for the under-the-seat location I had in mind.

I ordered one directly from the RotoPax web site and it arrived in less than a week. I knew as soon as I opened the box it was worth what they charge; it’s made from a very heavy thick plastic type of material that I’m sure would support my weight.


The fuel filler apparatus is well thought out and is easy to work with Red Dog’s short fuel tank opening without spilling a drop.

To operate it you simply turn a small green plastic ring to the lock position, then insert the snout into the fuel tank’s filler neck with the small hook catching the opening.


This action makes an audible click and fuel begins to flow into the tank. Lifting up on the RotoPax automatically shuts the fuel off so nothing gets spilled.
Of course the first time I used it I unintentionally lifted up and the fuel shut off...sometimes older guys get a little shakey, and I was pleasantly surprised how easy it was to turn the green ring without having to remove the nozzel from the tank.


I mentioned earlier that even with the RotoPax in place there's still plenty of storage space left under Red Dog’s saddle, both above the RotoPax and underneath. Most of what I keep there are emergency items; a small tool kit, tire repair kit, and so on.
  
I have to say I’m a happy camper with this product and I may order another one if I can find a place to store it. The really good thing about it is I’m no longer worried about having fuel or fumes lurking about waiting to explode and that alone makes it worth the $60 bucks.

So there you go, another adventurous outting with Red Dog Scooter. If you’d like to see what the folks at Roto Pax are up to just follow this link:

http://www.rotopax.com/about_rotopax.html

Hey I should be getting paid for this shouldn’t I?